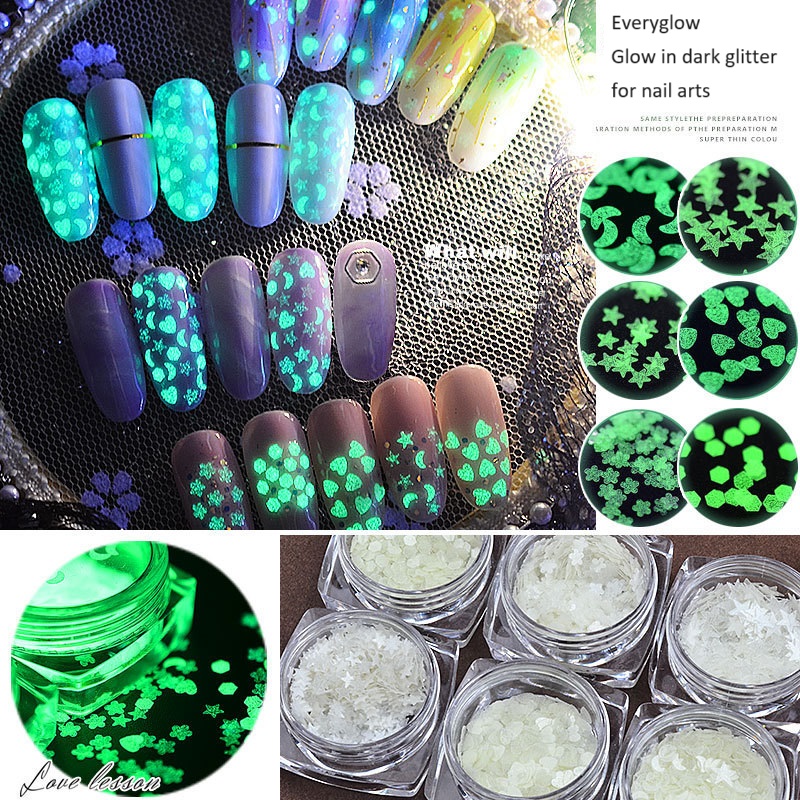
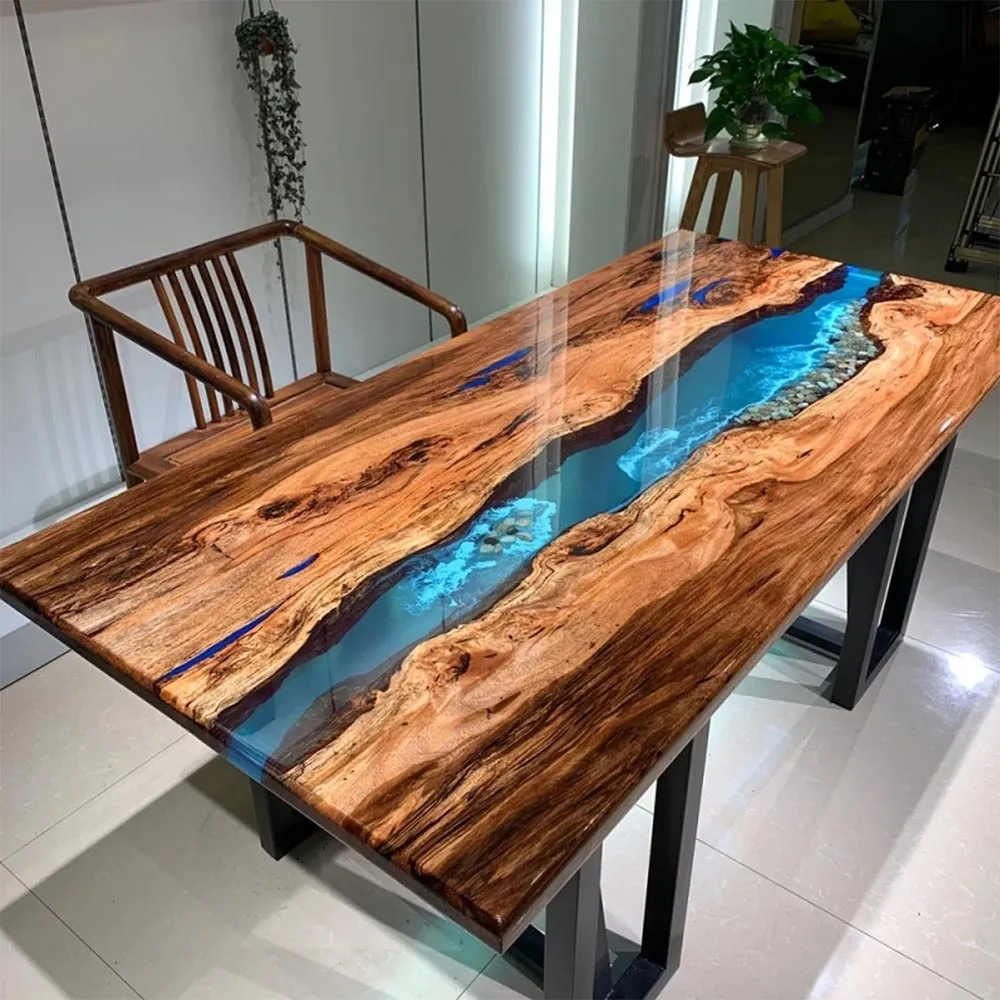
post

Glow in the dark artificial grass lawn

Glow-in-the-dark artificial grass made from PE material is an innovative choice for landscaping or decorative purposes. PE (polyethylene) is a common synthetic material used in artificial grass due to its durability. The glow effect is typically achieved through phosphorescent additives that absorb light during the day and emit it in the dark. It can add a unique and visually appealing touch to outdoor spaces.

post

Everyglow Glow in the Dark glitter for nail art tips

  1. Start with clean, dry nails. Apply a base coat to protect your nails.
  2. Choose a nail polish color that complements the glow-in-the-dark glitter.
  3. Apply the chosen nail polish as a base and let it dry completely.
  4. Use a clear top coat or a clear gel polish as a sticky base for the glitter.
  5. While the clear coat is still wet, sprinkle or carefully place the Everyglow Glow in the Dark glitter onto your nails. You can use a small brush or toothpick for precision.
  6. Gently press the glitter into the wet clear coat to ensure it adheres well.
  7. Allow the glitter to set and the clear coat to dry.
  8. Apply another layer of clear top coat or gel polish to seal and protect the glitter. This will also give your nails a smooth finish.

Remember to charge the glow by exposing your nails to light before entering a dark environment. Enjoy your glowing nail art!

post

To make glow slime using Everyglow glow in the dark powder, you can follow these steps:

  1. Gather ingredients: You’ll need clear or white glue, water, borax (as a slime activator), and Everyglow glow in the dark powder.
  2. Mix glue and water: In a bowl, mix equal parts clear or white glue and water. Stir until well combined.
  3. Add glow powder: Gradually add Everyglow glow in the dark powder to the glue mixture. Adjust the amount based on your desired level of glow.
  4. Mix thoroughly: Stir the mixture well to evenly distribute the glow powder throughout the slime.
  5. Prepare borax solution: In a separate container, dissolve borax in water to create a borax solution. Use about 1/4 teaspoon of borax per 1/2 cup of water.
  6. Activate the slime: Slowly add the borax solution to the glue mixture while stirring continuously. Stop adding the borax solution once the slime reaches your desired consistency.
  7. Knead the slime: Take the slime out of the bowl and knead it with your hands. This helps improve its texture and ensures the glow powder is evenly distributed.
  8. Charge under light: Expose the slime to a bright light source or sunlight to charge the glow powder. The slime will glow in the dark after being exposed to light.

Remember to handle borax with care and keep slime away from small children or pets, as it’s not meant to be ingested.

post

Creating glow-in-the-dark epoxy resin art using Everyglow photoluminescent pigment can be a fun and creative project.


Here’s a basic guide to help you get started:

Materials:

Epoxy resin kit
Everyglow photoluminescent pigment
Mixing cups and stir sticks
Silicone mold or surface for the artwork
Heat gun or torch (for removing air bubbles)
Disposable gloves and protective gear

Steps:

Prepare Your Workspace: Ensure you are in a well-ventilated area and have a clean, level workspace. Wear protective gear, including gloves and a mask if necessary.

Mix Epoxy Resin: Follow the instructions on your epoxy resin kit to measure and mix the resin and hardener in the specified ratio. Thoroughly stir the mixture to avoid any lumps.

Add Everyglow Photoluminescent Pigment: Gradually add the Everyglow photoluminescent pigment to the resin mixture. The amount will depend on your desired glow intensity. Start with a small amount and adjust as needed, stirring well to evenly distribute the pigment.

Pour the Resin:Pour the pigmented resin into your chosen mold or onto the surface where you want to create your epoxy art. Ensure that the surface is level to prevent uneven curing.Remove Air Bubbles:Use a heat gun or torch to carefully pass over the surface of the resin to remove any air bubbles. Be cautious not to overheat or scorch the resin.Allow Curing:Let the resin cure according to the instructions provided with your epoxy kit. This typically takes 24-48 hours, but curing times can vary.

Charge the Glow:Once the resin is fully cured, expose the artwork to a light source for a sufficient period to charge the Everyglow pigment. Natural sunlight or a UV light works well for this step.

Test the Glow:Turn off the lights to see the glow effect. The Everyglow photoluminescent pigment should emit a soft, glowing light in the dark.Experiment with different colors, layering techniques, or molds to create unique and personalized glow-in-the-dark epoxy resin art. Always follow safety guidelines provided by the resin and pigment manufacturers

post

To make glow-in-the-dark fridge magnets using Everyglow Glow in the Dark photo paper, follow these steps:

  1. Gather Materials:
  • Everyglow Glow in the Dark photo paper
  • Scissors or a craft knife
  • Fridge magnet backing or adhesive magnetic sheets
  • Images or designs for your magnets
  1. Design Your Magnets:
  • Create or choose images that you want to turn into magnets. Ensure they fit the size of your Everyglow Glow in the Dark photo paper.
  1. Print the Images:
  • Print your designs onto the Everyglow Glow in the Dark photo paper using a compatible printer. Follow the paper’s instructions for optimal printing settings.
  1. Cut Out the Magnets:
  • Use scissors or a craft knife to carefully cut out each printed design. Be precise to maintain the shape of your magnets.
  1. Attach to Magnetic Backing:
  • If you’re using individual magnet backings, apply adhesive to the back of each cutout and press it onto the magnetic backing. If you have adhesive magnetic sheets, simply attach the entire printed sheet to the magnetic side.
  1. Allow for Drying:
  • If any adhesive is used, allow the magnets to dry thoroughly according to the adhesive’s instructions.
  1. Charge in Light:
  • Place the magnets under a light source for a sufficient amount of time to charge the glow-in-the-dark effect. This step is crucial for the Everyglow material to absorb light energy.
  1. Test and Enjoy:
  • Once charged, turn off the lights to see the glow effect. Test the magnets on your fridge and enjoy your personalized glow-in-the-dark magnets.

Remember to follow the specific instructions provided by Everyglow for their Glow in the Dark photo paper, as different brands may have slightly different requirements for optimal results.

post

Illuminate Your Space with Everyglow Photoluminescent Vinyl

Introduction:
Everyglow Photoluminescent Vinyl is a revolutionary material that brings a touch of magic to your surroundings. Whether you’re looking to add a unique flair to your home, office, or any space, this luminescent vinyl is designed to captivate with its radiant glow. In this blog, we’ll explore the features, applications, and benefits of Everyglow Photoluminescent Vinyl, showcasing how it can transform your environment into a mesmerizing display of light.

Features:
1. **Long-Lasting Glow:** Everyglow Photoluminescent Vinyl absorbs light during the day and releases it in the form of a subtle, ethereal glow at night. This long-lasting luminescence creates a captivating ambiance in any setting.

2. **Versatility:** The vinyl is available in various colors and can be customized to fit your aesthetic preferences. From soothing blues to vibrant greens, Everyglow offers a wide range of options, allowing you to personalize your space.

3. **Durable and Weather-Resistant:** Built to withstand the test of time, Everyglow Photoluminescent Vinyl is durable and weather-resistant. Whether used indoors or outdoors, it maintains its glow, making it a reliable choice for a variety of applications.

Applications:
1. **Interior Design:** Enhance your home decor by incorporating Everyglow Photoluminescent Vinyl into various elements such as wall art, furniture accents, or even unique lighting fixtures. The vinyl’s glow will add a subtle and enchanting touch to your living spaces.

2. **Safety Signage:** Improve safety in your workplace or public areas by using Everyglow Photoluminescent Vinyl for emergency exit signs, stair markings, or hazard indicators. Its glow ensures visibility even in low-light conditions.

3. **Artistic Installations:** Unleash your creativity by using Everyglow to create captivating art installations. From murals to sculptures, this photoluminescent vinyl adds an extra dimension to artistic expressions.

Benefits:
1. **Energy Efficiency:** As Everyglow Photoluminescent Vinyl relies on natural light to charge, it’s an eco-friendly and energy-efficient solution. Say goodbye to traditional lighting and embrace a sustainable alternative.

2. **Low Maintenance:** Unlike traditional lighting solutions, Everyglow requires minimal maintenance. No need for wiring, power sources, or frequent replacements – just let it absorb light, and it will continue to glow.

3. **Unique Branding:** For businesses, incorporating Everyglow into signage or promotional materials can set you apart from the competition. The unique glow not only attracts attention but also leaves a lasting impression on customers.

Conclusion:
Everyglow Photoluminescent Vinyl opens up a world of possibilities for those seeking to infuse their spaces with a captivating glow. Its versatile applications, durability, and sustainability make it a standout choice for interior design, safety solutions, and artistic endeavors. Elevate your surroundings and let Everyglow illuminate your world.

post

Illuminating Creativity: Glow-in-the-Dark 3D Printing Filament

In the ever-evolving world of 3D printing, enthusiasts and creators are constantly seeking new ways to elevate their projects. One innovation that has captured the imagination of many is the glow-in-the-dark 3D printing filament. This luminescent material opens up a realm of possibilities, allowing makers to bring their designs to life in a whole new light—literally.

## The Science Behind the Glow

Glow-in-the-dark 3D printing filament is infused with phosphorescent materials that absorb ambient light and then emit it in the dark. This mesmerizing effect is achieved through a process called photoluminescence, where the material stores and re-emits light energy. This unique characteristic adds an enchanting dimension to 3D-printed objects, making them stand out in low-light environments.

## Applications in Art and Design

Imagine a world where your 3D-printed creations not only exist in the physical realm but also come alive when the lights go out. Glow-in-the-dark filament opens up exciting possibilities for artistic expression. From intricate sculptures and figurines to functional items like light switch plates or keychains, the filament adds a touch of magic to your designs.

One popular application is in creating customized nightlights. By incorporating glow-in-the-dark filament into your designs, you can craft unique and personalized nightlight covers that transform any room into a dreamy, luminescent space. The filament’s versatility allows for the creation of both whimsical and sophisticated designs, catering to various tastes and preferences.

## Educational Opportunities

Beyond its aesthetic appeal, glow-in-the-dark 3D printing filament serves as an engaging educational tool. Schools and educational institutions are leveraging this material to spark interest in science, technology, engineering, and mathematics (STEM) subjects. Students can explore the principles of light absorption and emission in a hands-on and visually captivating way, making learning more interactive and enjoyable.

## Practical and Functional Uses

While the glow-in-the-dark filament undoubtedly adds a fun element to projects, it also has practical applications. For example, printing labels or indicators with this filament can enhance visibility in low-light conditions. This feature can be particularly useful in creating safety signage, emergency exit markers, or even outdoor signage that remains visible after dark.

## Tips for Working with Glow-in-the-Dark Filament

1. **Optimal Printing Conditions:** Adjust your printer settings to accommodate the unique characteristics of glow-in-the-dark filament. Experiment with layer height, print speed, and temperature to achieve the best results.

2. **Charge Before Showcasing:** For maximum glow intensity, expose your 3D-printed objects to light before showcasing them in the dark. This ensures the phosphorescent material is charged and ready to emit a vibrant glow.

3. **Layer Thickness:** Consider adjusting the layer thickness to enhance or diminish the intensity of the glow. Thicker layers may result in a more pronounced effect.

In conclusion, glow-in-the-dark 3D printing filament is a game-changer for makers and creators looking to infuse a touch of magic into their projects. From artistic endeavors to educational initiatives, this luminescent material has the potential to illuminate both the physical and imaginative realms of 3D printing. So, charge up your creativity and let your designs shine bright in the dark!